
Anyhow, back to this particular project...
This a favorite of mine, and boy am I glad I expended the energy on creating it. I fell in love with vintage Vogue patterns after my sewing teacher gave me a few of her patterns from the late 60s and 70s. From there I realized that while I could enjoy today's patterns (and definitely still do), there is a lot to be said for hunting down these vintage finds on ebay and etsy instead. For one, all the vintage patterns are single sized, which means cutting out a pattern is much easier. (I typically take a 12 or 14 in vintage patterns but if I can't find my size, I am willing to put in some extra work on grading up or down to make the pattern fit me.) Another nice thing about these patterns is that the style of the decade can be made up in more modern fabrics, so while you have a "vintage" dress, it won't come with all the issues of vintage fabric. (That said, I do have a few yards of vintage fabric that has held up well, but for the most part, it does start to wear down with age unless properly stored.)
I also love the directions that come with vintage patterns, while not overly wordy, they have precisely the right way of explaining how to attempt something while sewing, so I am never confused. I do find that they expect more from me by hand, but that was also because many machines of that era were unable to do the things my current machine can do. I decided for this pattern that I would follow the directions as precisely as possible because I had entered a vintage pattern contest over at PatternReview.com and one of the ideas was that sewing up the vintage pattern would be as close to what ladies of the era would have done. Obviously we can't do everything exactly as the vintage patterns ask us to, but when I could, I did.
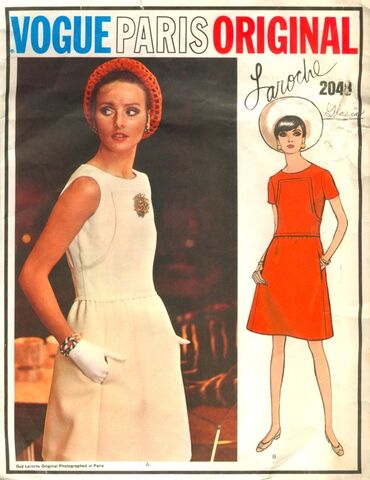
I was hunting around for some vintage Vogue patterns on ebay a couple of weeks after my teacher gave me hers when I discovered the pattern treasure trove known as Vogue Paris Original/Vogue Couturier/Vogue Americana. These three pattern groups still exist in some form or another today, and still have some of the hallmarks, like a designer name, a large format envelope, and one or two designs within the packet, but the allure seems to be less so with today's pattern than the ones from the 50s, 60s, and 70s. I am not sure why these patterns are less special, and they may not be, but wowza, some of the ones I have seen pop up on ebay and etsy have been grand, unique, and incredibly special.
So when I was able to buy a Guy Laroche dress pattern from 1968 or 1969 (still not sure of which year) for $16, I was all, "yes, please." :-)
I only own a handful of these beauties, but slowly I plan on sewing all of them, even though I probably shouldn't even be attempting them owing to my overall lack of tailoring experience. Eh, well, nothing ventured, nothing gained, right? I'm getting too old to let silly things like being less experienced stand in my way of making a really pretty dress, right?
Anyhow, here it is...my first attempt at a Vogue Paris Original.

I found the brooch in a sewing project bag that I purchased for $12. I have plans to make the bag for Christmas, but this brooch is exactly the right one for this dress, I decided to get the purse another bit of embellishment instead. (BTW, that bag project usually retails for $80--I scored when I found that at a closeout sale recently!)

I had the hardest time with the placement of the bib since I was off *just* a hair in one direction. So while it isn't readily apparent, the bodice's bib is slightly skewing to my left shoulder.
I also struggled a bit with setting in those sleeves, and many of my sewing minutes were spent steaming the heck out of the shoulder seams. Fortunately in the end, the sleeves look pretty good considering my beginner status.


I have plans to sew this pretty lady up in a heavier black wool (I used a lightweight sage green wool twill here) for the sleeveless version, and with that one I will go ahead and alter the back to zip all the way up instead, kind of like this lady did for hers.

1. The pattern didn't call for a ribbon at the waist, but I really loved how this satin bias ribbon looked with the green wool, so I figured out some way to add it to the waistband facing, which was kind of hard. My brain loves puzzles, but you really have to bend it to truly get how something that gets sewn in face in and wrong way up will look when it is face out and right side down.
2. You can see a little of the lace hem facing that I used in the sleeves. I also used the same lace facing for the hem, and I am a convert. I may start using facings for all of my hems since they look really good and add a bit of interest to the inside of the item.
3. You can also see the interlining/underlining peeking out of the sleeve. That was sewn up to the fashion fabric to act as one fabric together. That was kind of a pain, but for the sake of this project, and for this wool material, it was the right call, so I am glad Laroche's pattern forced my hand. The interlining also allowed me to hem the facings to the sleeves and hem without the thread showing through the top material, so the hems are seamless, which is pretty awesome.
I shouldn't have to interline/underline the heavier black wool with the next dress I make, which I am a *tiny* bit okay with. LOL.


If you look closely you will see the darts that were sewn in the first step of the project which led me to my mistaken thought that the dress would be easier to construct. Ha.

I have plans to shorten the entire waistband of the bib and back by an inch with the next go since the bodice overall is too long, which leads to a very poufy top when I am seated. The only place I can shorten the bodice is here since the rest of the bodice has too much going on for me to shorten it with any ease.


Okay, that's it for now. If you are interested in seeing my review over at Pattern Review, here it is. I entered the Vintage Pattern contest, so if you are a member and want to vote for me, I won't say no. Haha. :-)
I will probably be back tomorrow morning with news of a Cyber Monday sale from Boden. They had one last year, right?